大規模言語モデル(LLM)のWebUIを、condaを用いずWindowsにインストールして、モデルを使いAIで文章生成するまでの手順を解説します。
LoRA使用法や起動時の引数の説明和訳版なども載せ、各種設定項目について画像付きで丁寧に解説します。
1. 各種ダウンロード&インストール
Super Easy AI Installer Toolでクリックひとつでインストールできます。
一応従来のインストール手順↓も載せときます。
予めインストールしておくもの
- Python(当方3.10.7で動作確認済)
- Git
- CUDA関連
これらをインストール&パスの通った状態にします。
リポジトリダウンロード
適当なフォルダを作成し、フォルダ内で右クリック→「ターミナルで開く」を選択。
git clone https://github.com/oobabooga/text-generation-webui上記コマンドでリポジトリをダウンロードします。
仮想環境作成
次はtext-generation-webuiフォルダ内でターミナルを開き、以下のコマンドをコピペして実行します。
python -m venv venv
venv\Scripts\activate.ps1
仮想環境が作成できました。
Pytorchをインストール
PyTorchについてはCUDAバージョンなどに左右されるため、エラーなど出たら公式を確認してください。
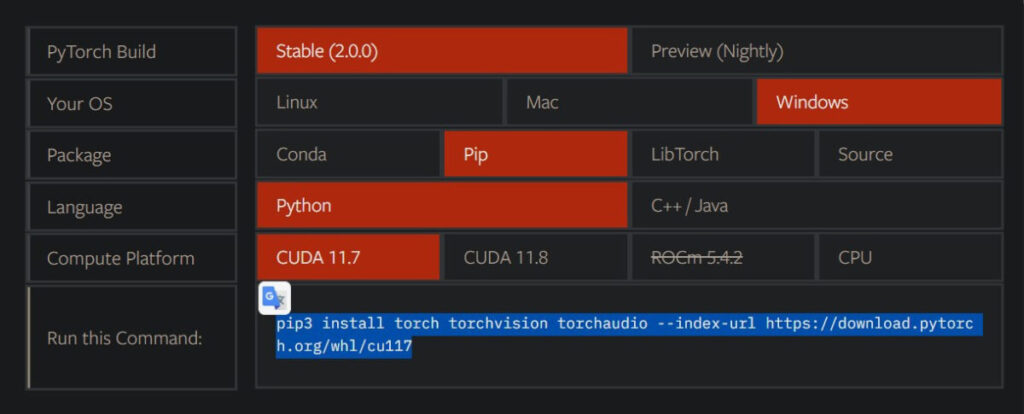
ここでは一例として当方の環境(上記画像の通り)のコマンドを載せておきます。
pip3 install torch torchvision torchaudio --index-url https://download.pytorch.org/whl/cu117それ以外をまとめてインストール
Pytorchをインストールしてから下のコマンドを実行しないと、エラーが出て正常にインストールできません。
(一度それでハマりましたOrz)
pip install -r requirements.txt※必ずPytorch→その他諸々の順でインストールしてください。
pip install -r requirements.txtをPytorchインストール前に行うとエラーが出ます。
これで必要なものは全て仮想環境内にインストールできました。
次は起動の前に、動かしたいモデルをダウンロードします。
2. 適当なモデルをダウンロードして起動
まず、仮想環境(venv)に入ります。
text-generation-webuiフォルダ内でターミナルを開き、以下のコマンドをコピペして実行します。
venv\Scripts\activate.ps1モデルをダウンロードする
HuggingFaceの組織名/モデル名を指定してダウンロードできます。
python download-model.py organization/modelここでは公式例通り、OPTの1.3Bモデルをダウンロードします。
python download-model.py facebook/opt-1.3btext-generation-webui>python download-model.py facebook/opt-1.3b Downloading the model to models\opt-1.3b Downloading file 1 of 9... 100%|████████████████████████████████████████████████████████████████████████████| 11.1k/11.1k [00:00<00:00, 5.56MiB/s] Downloading file 2 of 9... 100%|████████████████████████████████████████████████████████████████████████████| 8.81k/8.81k [00:00<00:00, 8.78MiB/s] Downloading file 3 of 9... 100%|█████████████████████████████████████████████████████████████████████████████████| 653/653 [00:00<00:00, 254kiB/s] Downloading file 4 of 9... 100%|█████████████████████████████████████████████████████████████████████████████████| 137/137 [00:00<00:00, 137kiB/s] Downloading file 5 of 9... 100%|███████████████████████████████████████████████████████████████████████████████| 456k/456k [00:00<00:00, 655kiB/s] Downloading file 6 of 9... 100%|████████████████████████████████████████████████████████████████████████████| 2.63G/2.63G [00:28<00:00, 93.4MiB/s] Downloading file 7 of 9... 100%|█████████████████████████████████████████████████████████████████████████████████| 441/441 [00:00<00:00, 441kiB/s] Downloading file 8 of 9... 100%|█████████████████████████████████████████████████████████████████████████████████| 685/685 [00:00<00:00, 447kiB/s] Downloading file 9 of 9... 100%|██████████████████████████████████████████████████████████████████████████████| 899k/899k [00:00<00:00, 1.05MiB/s]

モデルは「text-generation-webui\models」フォルダに保存されます。
WebUIを起動する
Python server.py上記コマンドでWebUIを起動します。
\text-generation-webui> Python server.py
Loading opt-1.3b...
Loaded the model in 2.86 seconds.
C:\Users\loveanime\Desktop\text-gen-webui\text-generation-webui\venv\lib\site-packages\gradio\deprecation.py:40: UserWarning: The 'type' parameter has been deprecated. Use the Number component instead.
  warnings.warn(value)
Running on local URL:  http://127.0.0.1:7860

To create a public link, set `share=True` in `launch()`.
流石に公式が「Its goal is to become the AUTOMATIC1111/stable-diffusion-webui of text generation.」と言うだけあって、ポート番号までWebUI(1111)感ありますね。
(ポート番号が被った場合は自動的に7861,7862などズラしてくれるので心配ご無用)
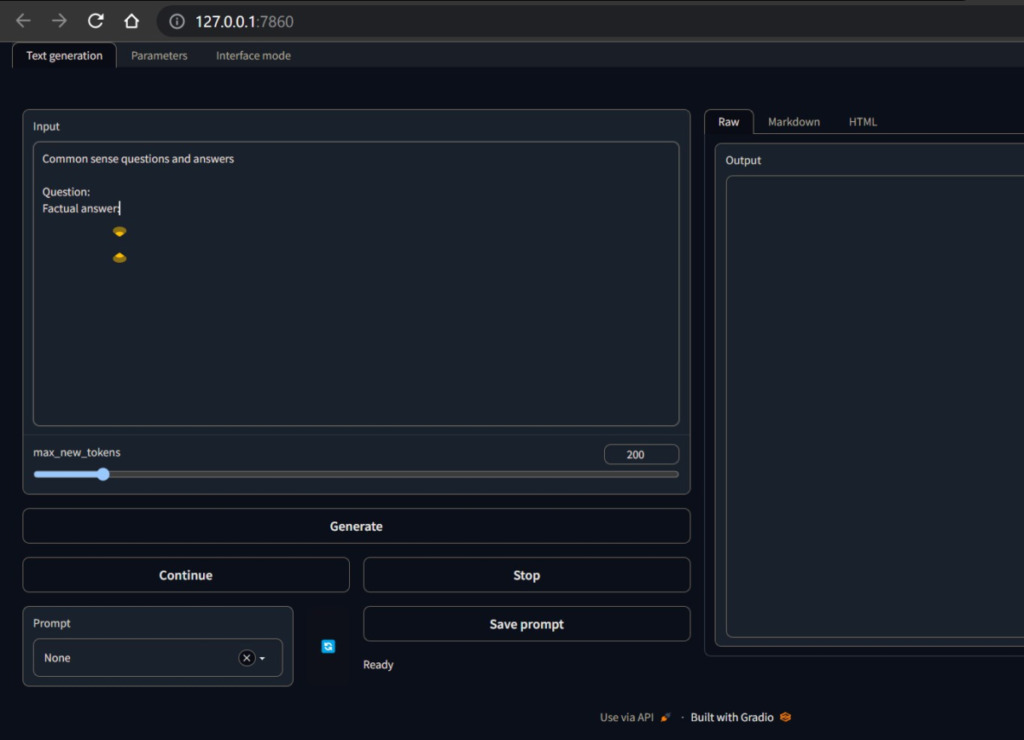
3.とりあえず言語モデルを動かしてお話する
最低限抑える設定項目
Text Generationタブを開き、左側のデカいInput欄に入力していきます。
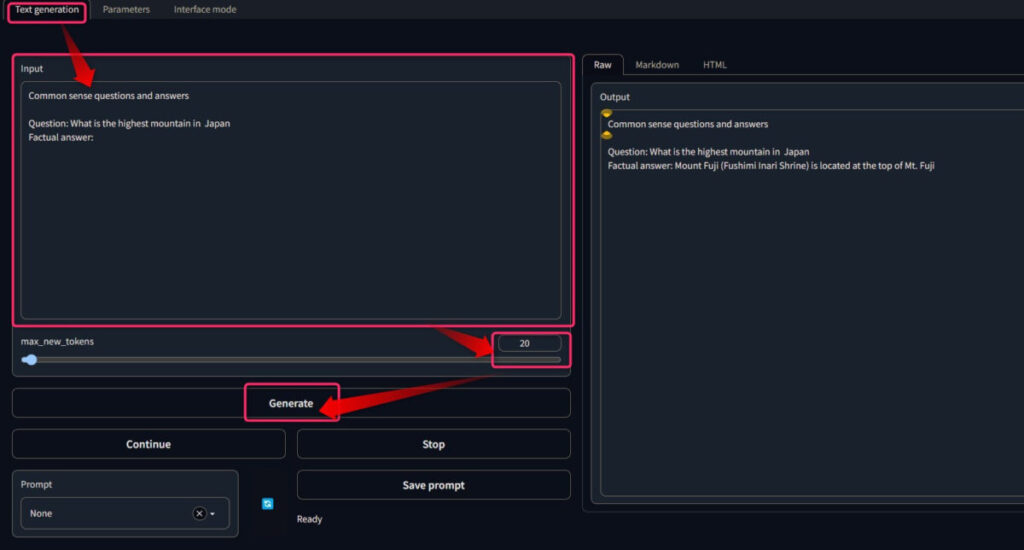
max_new_tokensを変えて、生成される文字の長さを変えられます。
(厳密には最大トークン数)
そして、Generationボタンで文章生成です。
これさえおさえておけば、とりあえず「webuiで文章生成できる!」と言えましょう。
ただ、他の設定についても知っておくとより使いこなせます。
使いこなす!知ってると便利な項目
Text Generationタブの他の設定はざっと解説。

- Continueボタン:max_new_tokens数だけ追加で文章生成
- Stopボタン:文章生成を中断
- Save promptボタン:プロンプトを保存する(エラーで出来ませんでした)
Prompt選択欄は、色々な定型文をInput欄に入力できる機能です。


| プリセット名 | 入力される定型文 |
|---|---|
| Alpaca | Below is an instruction that describes a task. Write a response that appropriately completes the request. Instruction: Write a poem about the transformers Python library. Mention the word “large language models” in that poem. Response: |
| Open Assistant | <|prompter|>Write a story about future of AI development<|endoftext|><|assistant|> |
| QA | Common sense questions and answers Question: Factual answer: |
| None | (何も入力しない) |
QAが楽ちんですね。
まあモデルによって使い分ける必要がありそうですが。
4. 詳細な設定項目紹介
Parameterタブの各種設定項目
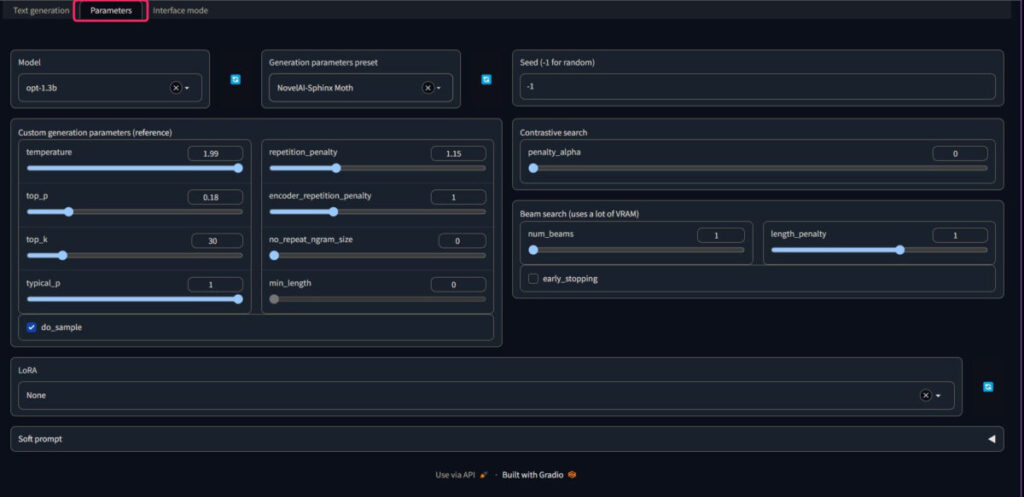
ここでは、使用するモデルを選択したり、生成時の各種設定パラメータを指定したりします。
一見バチクソ設定項目多く見えますが、プリセット設定をいくつか選べるのでイチから考え抜く必要はなさそうです。
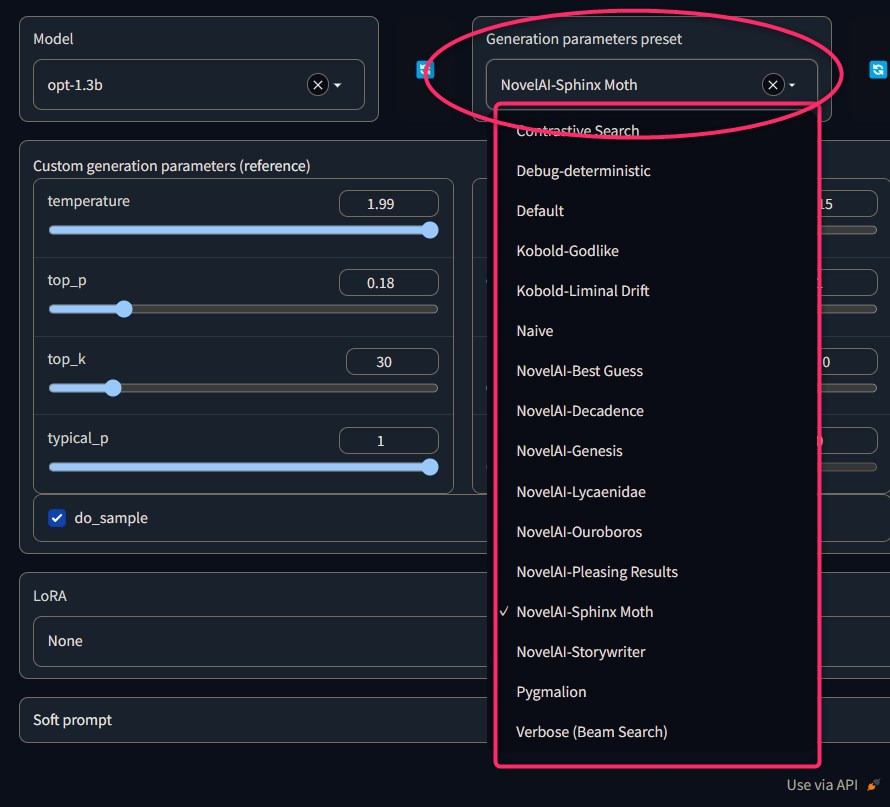
また、Seed値など基本ランダム(-1と入力しておくとそうなる)のままにしますし、右側↓は変えても変化がよくわからないので、デフォルトままにしました。

また、LoRAの適用もここから行います。

「text-generation-webui\loras」にLoRAファイルを配置しましょう。
まとめると、こうなります。
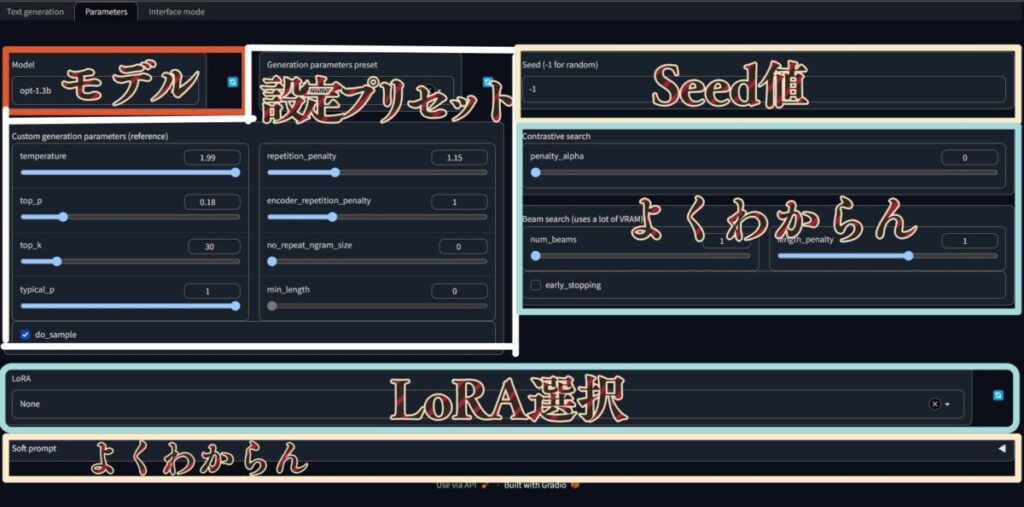
- モデル
- 設定プリセット
- LoRA選択
の3点だけ設定しておけば、私が思うに実用上問題ありません。
Interface modeについて
webuiは目的に合わせて色々な引数を付けて起動することができます。
今どんな引数付きで起動しているかをInterface modeタブで確認できます。
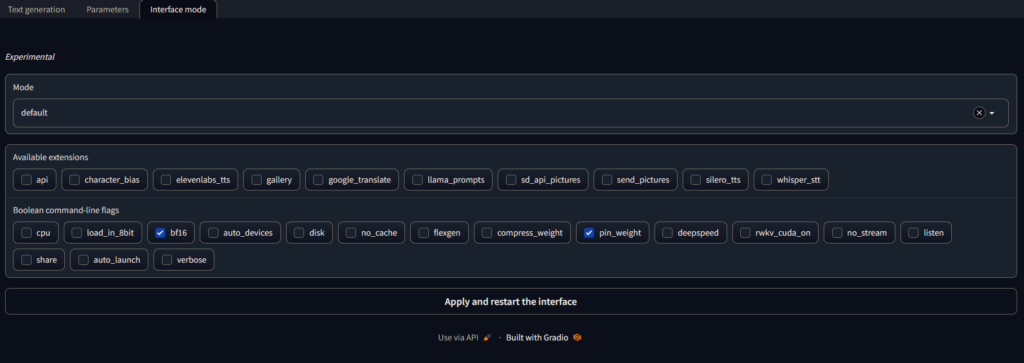
なお、Apply and restart the interfaceボタンからの設定適用は勧めません。
どうせエラーで反応しなくなります。(実体験)
一度ターミナル自体を閉じて、再度引数付きでwebuiを起動して適用しましょう。
例えば、--chatという引数をつける場合、以下のようにしましょう。
python server.py --chatよく使いそうないくつかのFlagは、赤字にしておきました。
引数により様々な機能を有効化できますね。
モデルやデバイスによっては無効なものもあり、私の和訳精度も微妙なため、一応使用時にはよく原文Descriptionを読んで下さい。。。
なお、表のflagsは表示フォントだかの問題で、『–』のように何故かハイフン(?)2連続なのにコピペすると1つとなってしまいます。
コピペで使用せず--chatのように2本を付けるようにしてください。
| Flag | Description | 解説和訳版 |
|---|---|---|
--h, --help | show this help message and exit | ヘルプを見る |
--model MODEL | Name of the model to load by default. | デフォルトでロードするモデルの名前。 |
--lora LORA | Name of the LoRA to apply to the model by default. | デフォルトでモデルに適用する LoRA の名前。 |
--notebook | Launch the web UI in notebook mode, where the output is written to the same text box as the input. | ノートブックモードでWeb UIを起動。 出力が入力と同じテキストボックスに書き込まれます。 |
--chat | Launch the web UI in chat mode. | チャットモードでWeb UIを起動します。 |
--cai-chat | Launch the web UI in chat mode with a style similar to Character.AI’s. If the file img_bot.png or img_bot.jpg exists in the same folder as server.py, this image will be used as the bot’s profile picture. Similarly, img_me.png or img_me.jpg will be used as your profile picture. | ファイル img_bot.png または img_bot.jpg が server.py と同じフォルダに存在する場合、この画像はボットのプロファイル画像として使用されます。 BOTのアイコン画像的な。 |
--cpu | Use the CPU to generate text. | CPUを使用してテキストを生成します。 |
--load-in-8bit | Load the model with 8-bit precision. | 8ビットの精度でモデルをロードします。 |
--wbits WBITS | GPTQ: Load a pre-quantized model with specified precision in bits. 2, 3, 4 and 8 are supported. | GPTQ: ビットで指定された精度で事前量子化モデルをロードします。 2, 3, 4, 8ビットをサポート。 |
--moel_type MODEL_TYPE | GPTQ: Model type of pre-quantized model. Currently only LLaMA and OPT are supported. | GPTQ: 事前量子化モデルのモデルタイプ。 現在、LLaMAとOPTのみがサポートされている。 |
--groupsize GROUPSIZE | GPTQ: Group size. | GPTQ:グループサイズ。 |
--pre_layer PRE_LAYER | GPTQ: The number of layers to preload. | GPTQ: プリロードするレイヤーの数。 |
--bf16 | Load the model with bfloat16 precision. Requires NVIDIA Ampere GPU. | bfloat16精度でモデルをロードする。 NVIDIA Ampere GPUが必要です。 |
--auto-devices | Automatically split the model across the available GPU(s) and CPU. | モデルを利用可能なGPUとCPUに自動的に分割します。 |
--disk | If the model is too large for your GPU(s) and CPU combined, send the remaining layers to the disk. | モデルがGPUとCPUの組み合わせには大きすぎる場合は、残りのレイヤーをディスクに送信します。 |
--disk-cache-dir DISK_CACHE_DIR | Directory to save the disk cache to. Defaults to cache/. | ディスクキャッシュを 保存する。 保存先はデフォルトではcache/です。 |
--gpu-memory GPU_MEMORY [GPU_MEMORY ...] | Maxmimum GPU memory in GiB to be allocated per GPU. Example: –gpu-memory 10 for a single GPU, –gpu-memory 10 5 for two GPUs. You can also set values in MiB like –gpu-memory 3500MiB. | GPUごとに割り当てられるGiBの最大GPUメモリ。 例:–gpu-memory 10 for a single GPU、–gpu-memory 10 for two GPU。–gpu-memory 3500MiBのようにMiBで値を設定することもできる。 |
--cpu-memory CPU_MEMORY | Maximum CPU memory in GiB to allocate for offloaded weights. Must be an integer number. Defaults to 99. | GiB の最大 CPU メモリは、オフロードされた重みを割り当てます。整数番号でなければなりません。デフォルトは 99 です。 |
--no-cache | Set use_cache to False while generating text. This reduces the VRAM usage a bit with a performance cost. | use_cache を False に設定し、テキストを生成します。 |
--flexgen | Enable the use of FlexGen offloading. | FlexGenオフロードの使用を有効にします。 |
--percent PERCENT [PERCENT ...] | FlexGen: allocation percentages. Must be 6 numbers separated by spaces (default: 0, 100, 100, 0, 100, 0). | FlexGen: 割り当て割合. スペースで区切られた6つの数値でなければなりません(デフォルト: 0, 100, 100, 0, 100, 0)。 |
--compress-weight | FlexGen: Whether to compress weight (default: False). | FlexGen: 重みを圧縮するかどうか(デフォルト: False)。 |
--pin-weight [PIN_WEIGHT] | FlexGen: whether to pin weights (setting this to False reduces CPU memory by 20%). | FlexGen: 重み付けするかどうか(これをFalseに設定するとCPUメモリが20%削減されます)。 |
--deepspeed | Enable the use of DeepSpeed ZeRO-3 for inference via the Transformers integration. | Transformersインテグレーションによる推論にDeepSpeed ZeRO-3を使用することができる。 |
--nvme-offload-dir NVME_OFFLOAD_DIR | DeepSpeed: Directory to use for ZeRO-3 NVME offloading. | DeepSpeed: ZeRO-3 NVMEオフロードに使用するディレクトリ。 |
--local_rank LOCAL_RANK | DeepSpeed: Optional argument for distributed setups. | DeepSpeed: 分散セットアップのオプション引数。 |
--rwkv-strategy RWKV_STRATEGY | RWKV: The strategy to use while loading the model. Examples: “cpu fp32”, “cuda fp16”, “cuda fp16i8”. | RWKV: モデルのロード時に使用する戦略。 例: “cpu fp32”, “cuda fp16”, “cuda fp16i8″。 |
--rwkv-cuda-on | RWKV: Compile the CUDA kernel for better performance. | RWKV: CUDAカーネルをコンパイルしてパフォーマンスを向上させます。 |
--no-stream | Don’t stream the text output in real time. | テキスト出力をリアルタイムでストリーミングしないでください。 |
--settings SETTINGS_FILE | Load the default interface settings from this json file. See settings-template.json for an example. If you create a file called settings.json, this file will be loaded by default without the need to use the –settings flag. | この json ファイルからデフォルトのインターフェース設定をロードします。 例を挙げると、settings-template.json を参照してください。settings.json というファイルを作成すると、このファイルは –settings フラグを使用せずにデフォルトでロードされます。 |
--extensions EXTENSIONS [EXTENSIONS ...] | The list of extensions to load. If you want to load more than one extension, write the names separated by spaces. | ロードする拡張子のリスト 複数の拡張子を読み込む場合は、スペースで区切られた名前を書きます。 |
--listen | Make the web UI reachable from your local network. | ローカルネットワークからWeb UIにアクセスできるようにします。 |
--listen-port LISTEN_PORT | The listening port that the server will use. | サーバーが使用するリスニングポート。 |
--share | Create a public URL. This is useful for running the web UI on Google Colab or similar. | パブリックURLを作成する これは、Google ColabなどでWeb UIを実行するのに便利です。 |
--auto-launch | Open the web UI in the default browser upon launch. | 起動時にデフォルトのブラウザでWeb UIを開きます。 |
--verbose | Print the prompts to the terminal. | プロンプトをターミナルに表示。 |
まとめ 大規模言語モデル(LLM)用webuiをWindowsで動かす
- Python・Git・CUDA関連をインストール
- リポジトリをダウンロード
- 仮想環境を作りインストール
(Pytorchを最初にインストールしましょう!!) - モデルダウンロード
- WebUI起動
- 簡単な設定で色々AIと会話してみる
- 目的に応じた引数付きで起動してみる
GitHubの公式がAnaconda推進派なのか、例がcondaのためインストール躊躇してまししたが、普通にconda不使用でWindowsにインストールできましたね!!
画像生成のWebUI(Automatic1111)と双璧を成すWebUIになることを応援しています!!
将来的に拡張機能が整備されて、各種検索などがやりやすくなるといいなぁ~
他にも色々面白いAIを動かしているので、是非合わせてご覧ください!!


