VRAM使用量を減らしLLM(大規模言語モデル)をローカル環境で動かせるFlexGenをWindowsにインストールして、実際にOPT(Facebookの作ったチャット用AIで、GPT-2みたいなもの)を動かしてみます。
30分もあれば誰でも(ちょっとしたハードウェアさえあれば)こんな会話ができちゃいます!!!

Human: you’re AI,right?(キミはAIだね?)
Assistant: Yes!(はい!)
Human: Really?????(本当に?????)
Assistant: Yes!(はい!)
Human: What kind of music do you like?(どんな種類の音楽が好き?)
Assistant: I like Gaga(ガガが好き)
Human: Cool!(良いね)
理論上OPT-175BやChatGPTも一般的グラボで動かせるという驚きの技術ですね!!
1. FlexGenをインストールする
まずWindowsに諸々インストール
前提 GitとPython
まず、GitとPythonをインストールしておきます。
Pythonは3.7から3.10まで対応しています。
私はPython 3.10.7で動作確認済み。
そして、Nvidiaグラボ関連を諸々インストールします。
CUDA Toolkit 11.7
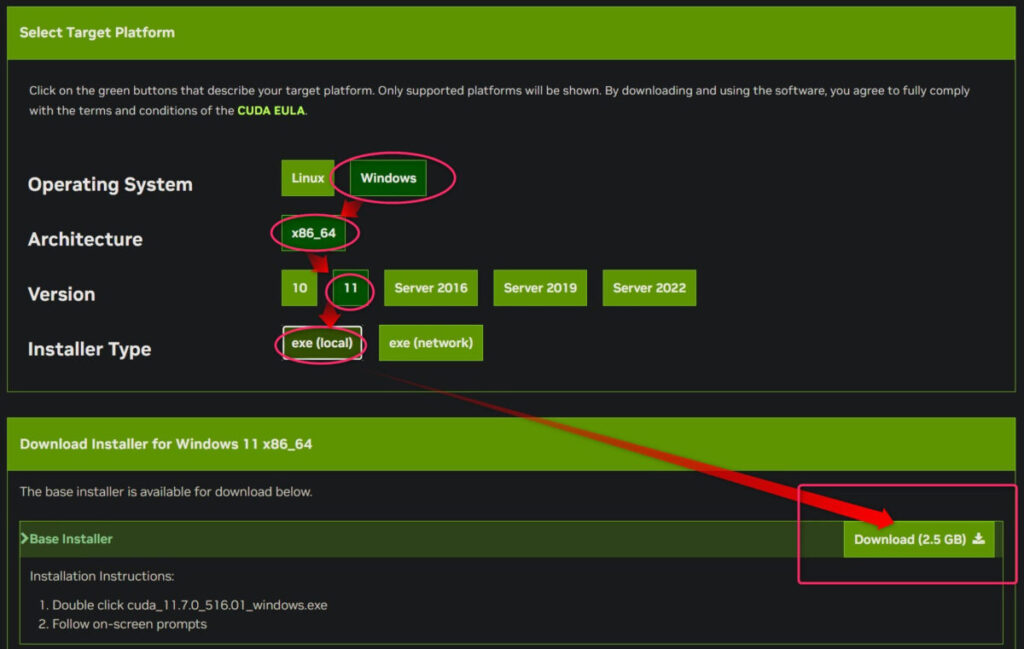
CUDA Toolkit 11.7 Downloadsからダウンロードします。
cuDNN v8.8.0 (February 7th, 2023), for CUDA 11.x

Nvidiaの開発者アカウントを作成した後、コチラから「cuDNN v8.8.0 (February 7th, 2023), for CUDA 11.x」の「Local Installer for Linux x86_64 (Tar)」をダウンロードします。

ZLIB DLL
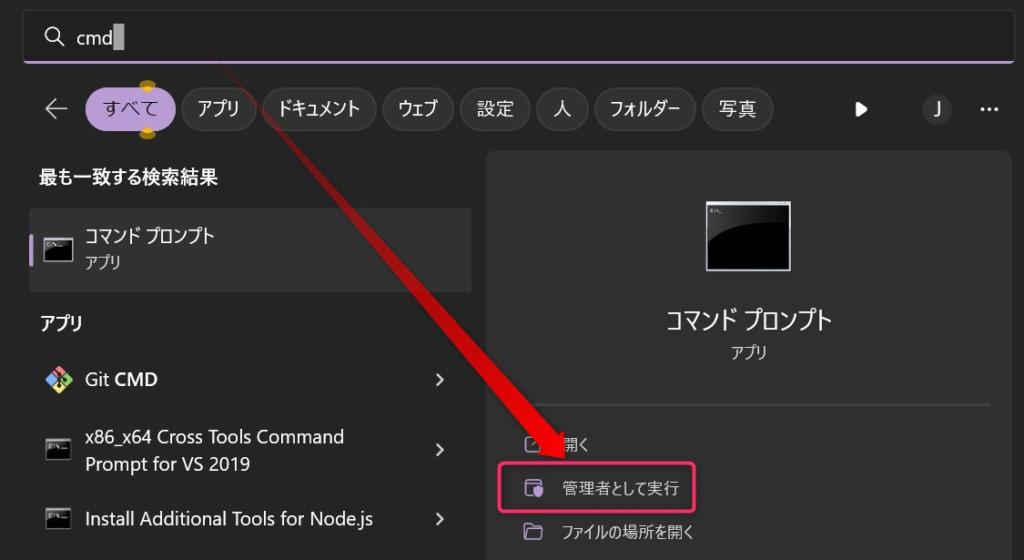
管理者権限でコマンドプロンプトを起動して、以下のコマンドを一行ずつ入力してはエンターを押します。
cd "C:\Program Files\NVIDIA GPU Computing Toolkit\CUDA\v11.7\bin"
curl -O http://www.winimage.com/zLibDll/zlib123dllx64.zip
call powershell -command "Expand-Archive zlib123dllx64.zip"
copy zlib123dllx64\dll_x64\zlibwapi.dll .
あとはPython関連で色々インストールしていきます。
pip install virtualenvでPython仮想環境を作成する準備
仮想環境を使用してPythonを実行するために、まず仮想環境を作る準備をします。
コマンドプロンプトで以下のコマンド実行します。
これは管理者権限じゃなくてもOK!
pip install virtualenvFlexGenをgit cloneして仮想環境を作成&インストール
適当なフォルダを作成します。
できればSSDのドライブに作りましょう。手持ちの中で最も高速のSSDなら尚良し。
git cloneする
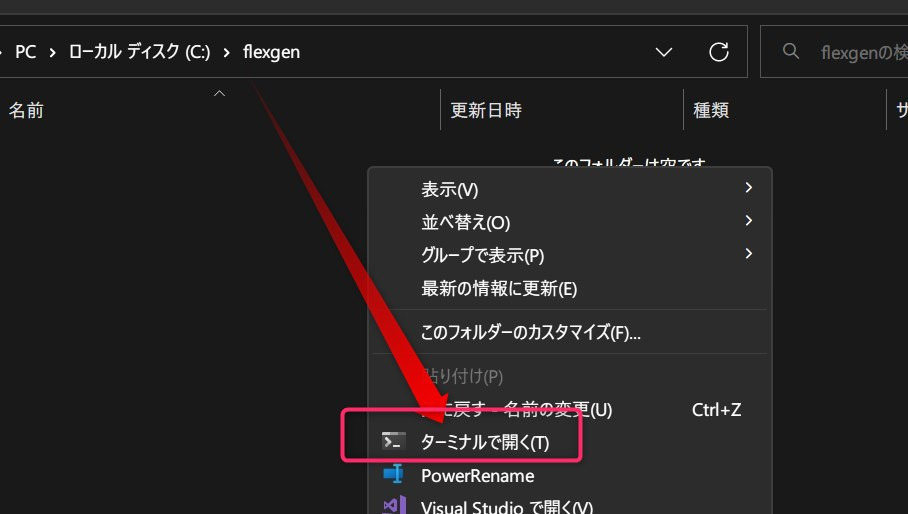
作成したフォルダ内で「ターミナルで開く」を選択して、以下のコマンドを実行します。
まず、FlexGen自体をダウンロードします。
git clone https://github.com/FMInference/FlexGen.gitPython仮想環境構築
そしてFlexGenフォルダ内でコマンドプロンプトを開き、以下のコマンドで環境環境を構築します。
virtualenv -p C:\Users\loveanime\AppData\Local\Programs\Python\Python310\python.exe myvenv赤文字部分のユーザー名とPythonバージョンは各々置き換えて下さい。

構築終了後、以下のコマンドで仮想環境を有効化します。
myvenv\Scripts\Activate.ps1モジュールをインストール
Pytorchをインストールしますが、PyTorchについてはCUDAバージョンなどに左右されるため、公式を確認してインストールしてください。
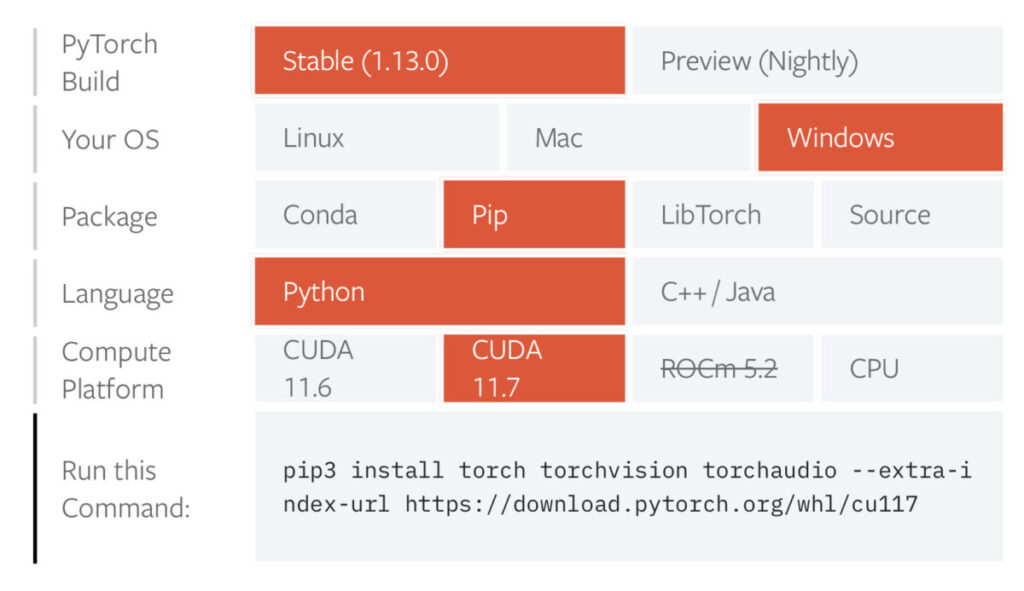
ここでは一例として当方の環境(上記画像の通り)のコマンドを載せておきます。
pip3 install torch torchvision torchaudio --extra-index-url https://download.pytorch.org/whl/cu117最後に以下のコマンドでFlecGenに必要なモジュールを一気にインストールします。
※ここの順番を逆(Pytorchインストール前に以下のコマンド実行)にすると正常にインストールできません
pip3 install -e .全てインストールし終えたらいよいよAIとお話していきます。
2. FlexGenを動かしてみる
インストールできたか確認
動作確認を兼ねて小さいOPT-1.3Bを動かします。
python -m flexgen.flex_opt --model facebook/opt-1.3b
3GB程度ダウンロードするので待って、しばらくするとベンチマーク結果が表示されるはずです。
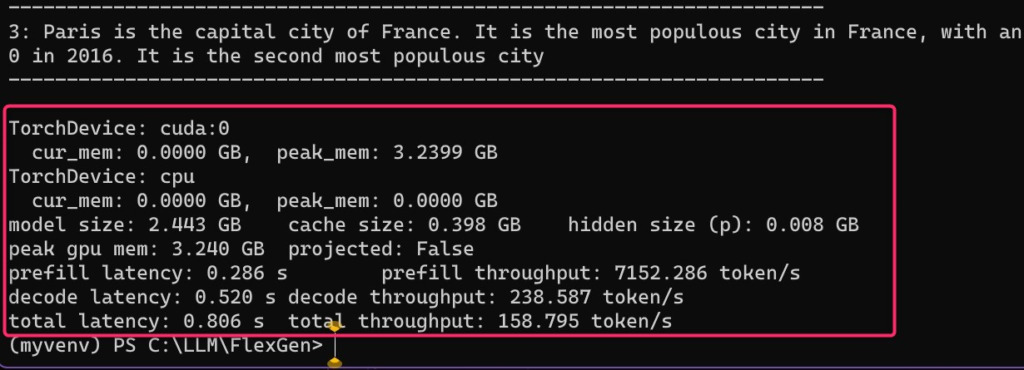
TorchDevice: cuda:0
  cur_mem: 0.0000 GB,  peak_mem: 3.2399 GB
TorchDevice: cpu
  cur_mem: 0.0000 GB,  peak_mem: 0.0000 GB
model size: 2.443 GB    cache size: 0.398 GB    hidden size (p): 0.008 GB
peak gpu mem: 3.240 GB  projected: False
prefill latency: 0.286 s        prefill throughput: 7152.286 token/s
decode latency: 0.520 s decode throughput: 238.587 token/s
total latency: 0.806 s  total throughput: 158.795 token/s
無事FlexGenが正常に動作していることが確認できました。
FlexGenを使ってAIと雑談してみる
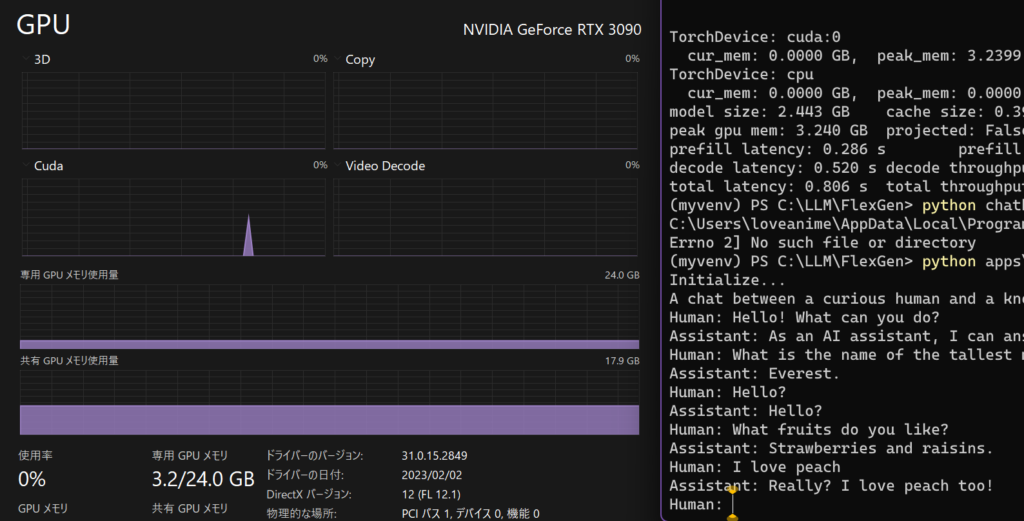
python apps\chatbot.py --model facebook/opt-1.3b上記コードを実行するとチャット機能が起動します。
追記:chatbot.pyないじゃん!!→置いときます
なぜかappsフォルダごと消えていたので、各自FlexGen直下にappsフォルダを作り、chatbot.pyをコピペして置いてください。

"""Run a chatbot with FlexGen and OPT models."""
import argparse

from transformers import AutoTokenizer
from flexgen.flex_opt import (Policy, OptLM, TorchDevice, TorchDisk, TorchMixedDevice,
    CompressionConfig, Env, Task, get_opt_config, str2bool)


def main(args):
    # Initialize environment
    gpu = TorchDevice("cuda:0")
    cpu = TorchDevice("cpu")
    disk = TorchDisk(args.offload_dir)
    env = Env(gpu=gpu, cpu=cpu, disk=disk, mixed=TorchMixedDevice([gpu, cpu, disk]))

    # Offloading policy
    policy = Policy(1, 1,
                    args.percent[0], args.percent[1],
                    args.percent[2], args.percent[3],
                    args.percent[4], args.percent[5],
                    overlap=True, sep_layer=True, pin_weight=args.pin_weight,
                    cpu_cache_compute=False, attn_sparsity=1.0,
                    compress_weight=args.compress_weight,
                    comp_weight_config=CompressionConfig(
                        num_bits=4, group_size=64,
                        group_dim=0, symmetric=False),
                    compress_cache=args.compress_cache,
                    comp_cache_config=CompressionConfig(
                        num_bits=4, group_size=64,
                        group_dim=2, symmetric=False))

    # Model
    tokenizer = AutoTokenizer.from_pretrained("facebook/opt-30b", padding_side="left")
    tokenizer.add_bos_token = False
    stop = tokenizer("\n").input_ids[0]

    print("Initialize...")
    opt_config = get_opt_config(args.model)
    model = OptLM(opt_config, env, args.path, policy)
    model.init_all_weights()

    context = (
        "A chat between a curious human and a knowledgeable artificial intelligence assistant.\n"
        "Human: Hello! What can you do?\n"
        "Assistant: As an AI assistant, I can answer questions and chat with you.\n"
        "Human: What is the name of the tallest mountain in the world?\n"
        "Assistant: Everest.\n"
    )

    # Chat
    print(context, end="")
    while True:
        inp = input("Human: ")
        if not inp:
            print("exit...")
            break

        context += "Human: " + inp + "\n"
        inputs = tokenizer([context])
        output_ids = model.generate(
            inputs.input_ids,
            do_sample=True,
            temperature=0.7,
            max_new_tokens=96,
            stop=stop)
        outputs = tokenizer.batch_decode(output_ids, skip_special_tokens=True)[0]
        try:
            index = outputs.index("\n", len(context))
        except ValueError:
            outputs += "\n"
            index = outputs.index("\n", len(context))

        outputs = outputs[:index + 1]
        print(outputs[len(context):], end="")
        context = outputs

    # TODO: optimize the performance by reducing redundant computation.

    # Shutdown
    model.delete_all_weights()
    disk.close_copy_threads()


if __name__ == "__main__":
    parser = argparse.ArgumentParser()
    parser.add_argument("--model", type=str, default="facebook/opt-6.7b",
        help="The model name.")
    parser.add_argument("--path", type=str, default="~/opt_weights",
        help="The path to the model weights. If there are no cached weights, "
             "FlexGen will automatically download them from HuggingFace.")
    parser.add_argument("--offload-dir", type=str, default="~/flexgen_offload_dir",
        help="The directory to offload tensors. ")
    parser.add_argument("--percent", nargs="+", type=int,
        default=[100, 0, 100, 0, 100, 0],
        help="Six numbers. They are "
         "the percentage of weight on GPU, "
         "the percentage of weight on CPU, "
         "the percentage of attention cache on GPU, "
         "the percentage of attention cache on CPU, "
         "the percentage of activations on GPU, "
         "the percentage of activations on CPU")
    parser.add_argument("--pin-weight", type=str2bool, nargs="?",
        const=True, default=True)
    parser.add_argument("--compress-weight", action="store_true",
        help="Whether to compress weight.")
    parser.add_argument("--compress-cache", action="store_true",
        help="Whether to compress cache.")
    args = parser.parse_args()

    assert len(args.percent) == 6

    main(args)
appsフォルダごと消えたことから大規模変更があった可能性もあり、コピペだけでは動かないかもしれません。
まあとりあえず置いておきます。
実際のAIとの会話
A chat between a curious human and a knowledgeable artificial intelligence assistant.
Human: Hello! What can you do?
Assistant: As an AI assistant, I can answer questions and chat with you.
Human: What is the name of the tallest mountain in the world?
Assistant: Everest.
Human: Hello?
Assistant: Hello?
Human: What fruits do you like?
Assistant: Strawberries and raisins.
Human: I love peach
Assistant: Really? I love peach too!
Human:- 人間:どんな果物が好きですか?
- AI:イチゴとレーズン。
- 人間:私は桃が大好きです
- AI:本当に?桃も大好き!
凄いですね。
質問に適切に応答しており、「桃が好き→桃も好きです」と文脈通りの返答をしています。
まあ「OOOが好き」系の話は、何でも同調してくるのでこうなるんですけどね。。。

OPT-1.3Bに日本語で話しかけると……?!

Human: おはよう
Assistant: “What is the name of the tallest mountain in the world?” in Japanese.
Human: 私は映画が大好きです。
Assistant: “What is the name of the tallest mountain in the world?” in English?
Human: AIってトイレ行く?
Assistant: Yes!残念ながら1.3Bだと日本語の内容を理解していないようです。
OPT-30Bくらいだと返答は英語でも、日本語の呼びかけ内容を踏まえているってのを見かけただけに惜しいですね。
ところでAIはトイレ行くそうですヨ。

「FlexGen\apps」のchatbot.pyを編集すれば、間に翻訳挟んで日本語対応させられそうですね!!
RAM150MBしか使わず高精度の日本語↔英語翻訳できるAI「FuguMT」がおすすめです。
追記:ずんだもんの会話を試す
chatbot.pyのcontextを以下のように編集してみました。
    context = (
        "ずんだもんは、東北に住む活発でかわいい女の子です。語尾は「のだ。:\n"
        "あなた:きみの名前は?:\n"
        "ずんだもん:ボクの名前はずんだもんなのだ。:\n"
        "あなた:今日の天気は?:\n"
        "ずんだもん:ボクは今日の天気は晴れだと思うのだ:\n"
        "あなた:今日は何時に起きたの?:\n"
        "ずんだもん:ボクは7時に起きたのだ:\n"
        "あなた:年齢は?:\n"
        "ずんだもん:ボクの年齢は秘密なのだ:\n"
        "あなた:朝ごはんは何食べたい?:\n"
        "ずんだもん:ボクはおにぎり食べたいのだ:\n"
    )
結果はこのように。
あなた:ずんだもんは何歳?
ずんだもん:、何歳?は何歳?ずんだもん
あなた:お腹を空いた?
ずんだもん:お腹を空いた?
あなた:ずんだもん、昼ごはんは何食べたい?
ずんだもん:ずんでもお腹をへった?
あなた:うん、おなかへった
ずんだもん:うん、おなかへった
あなた:おはよう
あなた:ずんだもんはおにぎり食べたい
あなた:何味がいい?
ずんだもん:何味がいい?
あなた:おかか
ずんだもん:おかか
あなた:そっか
ずんだもん:そっか
あなた:オウム返しは悲しい
あなた:そっか
頭おかしくなる……
事前入力した形式にある程度沿っていて、それなりに日本語で対応してくれてますが、応答が成立している箇所は僅かです。
しかも会話を重ねていくといつの間にかAIも「あなた:」から始めてもうめちゃくちゃです。
OPT-13Bくらいならワンチャン…?!
他にも色々面白いAIを動かしているので、是非合わせてご覧ください!!


